Friday, April 06, 2018
Crickets!!! I'm hearing CRICKETS!!
Welcome back to my archaic blog. Started years ago as merely a creative "mommy" outlet, now, it is simply therapy for boredom. ;)
So much has happened since my last post - a kid with cancer (he's doing awesome currently!), the sad passing of cherished pets, the retirement of my little soap business, my current path completing nursing prerequisite classes (totally blazing a trail too..my Oma would be mega proud!), and the impending out of state move. WHEW...see why I didn't keep up with the blog?!
Stay tuned for a link to my new video ~
My boys (now guys) actually asked me to create a video series for them, illustrating the "hows" of their culinary home recipe favs. It's a pain, but I love them, so....
Stay tuned!! XOXO
Saturday, August 10, 2013
What a year!!
I'm still alive! I realize I've been MIA...this is what happens when real life forces to be reckoned with. ;) Hang tight friends, I'm feeling creative again ~ see you next week!
Saturday, October 20, 2012
Saturday Afternoon Quickie - Quick Stove Top Mac & Cheese

And what better way to kick things off then to whip up a delicious side dish like good old Mac & Cheese? Oh no no no...not the boxed stuff, I mean yikes, please...I'm talking the real thing!
I know, I know...there are literally THOUSANDS of recipe versions out there - and I'm guessing that you probably already have your version tucked away. HOWEVER, what if there were an easy Mac & Cheese out there that you could slam onto the table is 15 minutes or less? A Mac & Cheese that you could customize effortlessly - a little more cheddar, possibly slide some Asiago in there or maybe sautéed onions or even crumbled bacon - YUM! I have a friend that even pops a few sliced jalapeños in her version - and I must confess, I would love to try that someday!
Being a busy mom, I rarely have the time to wait an hour or more for a side dish to complete baking in the oven. That being said, this recipe is my go-to quickie Mac & Cheese solution. Enjoy friends!!
Quick Stove Top Mac & Cheese - makes 4 servings
8 oz. elbow pasta
1 TBL unsalted butter
4-5 oz. sharp cheddar cheese - grated
2 oz. Velveeta - cubed
1/4 cup parmesan cheese - grated
1/4 cup heavy cream
1/3 cup 2% milk
1 tsp Dijon mustard - has to happen, trust me - don't leave it out
salt and pepper to taste (I use about 1/4 tsp of each)
dash of Texas Pete - or any favorite hot sauce (a tiny pinch of red pepper flakes will work too)
*Panko crumbs - optional* (but super yummy!)
Okay, this is super uncomplicated ~ just have all of your ingredients ready to roll and I promise this recipe will be tasty and painless. (wink!)
Prepare your pasta in a pot according to the package instructions...but try not to allow the pasta to become mushy!
While pasta is draining, pop the butter into the pot to melt.
Return pasta to the pot and add the cheeses. Mix thoroughly until the cheeses have melted - turn the stove on low for a minute or two if you need to kick start the process.
Add the cream, milk, and mustard - mix until the sauce pulls together.
Now salt and pepper to your liking...and don't forget that little dash of your favorite hot sauce!
Serve right away!
Now sometimes, when I'm feelin' fancy...I'll take a small skillet and gently brown a handful of plain Panko crumbs with a tad of salted butter. Sprinkle the crumbs on top of this dish, and you'll feel less guilty that it didn't spend an hour in the oven - ha!
Thanks for the QUICKIE (wink!), I'll see ya next week!

Sunday, March 11, 2012
Saturday Afternoon (on a SUNDAY NIGHT) Quickie - DIY All-Purpose Cleaning Spray!

Weekly Reminder: What is a "QUICKIE" anyway?...hmmmmm, found this online: "Very little foreplay, quick finish. Usually 5-10 minutes, start to finish.." Perfect! Since I've demonstrated how blog challenged I am this year AND last, a speedy, once a week drop-in is JUST what the doctor ordered (wink!).
So clear your calendars, I'm all yours for 10 minutes every weekend...rawr
I'm back and Spring is around the corner, so Let's Get Squeaky!...

In my recent quest to save-save-save, I made it my mission to hunt down a "dupe" recipe for an all-purpose household spray cleaner that ACTUALLY would work on counter tops, mirrors, windows and even floors in a pinch!
Spring cleaning time is just around the corner - arm yourselves ~
You probably have most of these ingredients, so get under your sinks and dig this stuff out girls...
After reading and trying many recipes and after some tweaking - this is what I came up with:
Homemade All-Purpose Spray Cleaner
makes approx. 88 oz. (0.6875 of a gallon)
aka Grease Cutter
64 ounces of hot water
5 ounces ammonia
3 ounces white vinegar
16 ounces rubbing alcohol
4 good squirts of Dawn dish soap (any kind will do...)
Take care to incorporate the dish soap gently (to avoid a bubble nightmare) after mixing all of the other ingredients together. Pour into a clean spray bottle and there you go! In my effort to recycle, I store the extra cleaner in a gallon sized empty Heinz white vinegar jug.
I have found this stuff to leave little if any streaks on my mirrors - but if you feel the formulation needs help in this area, simply add a tad more white vinegar...that should do the trick.
Below is a badly photographed (I was super "spent" that day!) before-and-after example of what this stuff did to a nasty, crusty, dusty, dirty file folder holder I found in the garage. I simply sprayed the heck out of it, covering every surface. I let it sit for 2-3 minutes, then used my hose to rinse. My fingers NEVER scrubbed an inch - the cleaner lifted the dirt so well, that I was able to use the hose only to finish the job. Wowzie ~
Before

After

Just a note here...for tougher stains and spots simply spray and let it sit for a moment before wiping. You might also notice small spots left over on glass or mirrors ~ there seems to be a "theory" out there that Windex adds a bit of wax to their formulation, and what you're seeing is "the left over wax" from your last cleaning session. Once you get that stuff off, your homemade cleaner should keep your glass and mirrors "honestly" sparkling clean.
Here's to showing off your clean-y-clean home and picking up everyone's jaw off of the floor when they discover that you actually MADE the cleaner to do it!
p.s.: use at your own risk and/or discretion - I am not responsible for any ruined furniture or appliances!
Thanks for the QUICKIE (wink!), I'll see ya next week!
Monday, January 30, 2012
Okay...it's been WAYYYY TOOOO LONGGG!
Life is a roller coaster, and as soon as "my" ride slows down - I'll upload a new post!
A quick and completely sincere thank you to my pals who have stuck like glue ~ we're a small group, but a loyal one ;)
See you very, very soon......
A quick and completely sincere thank you to my pals who have stuck like glue ~ we're a small group, but a loyal one ;)
See you very, very soon......
Saturday, July 09, 2011
Saturday Afternoon Quickie - Vanilla Ice Cream
Summertime quickies are the best! ;)

It's summer....it's HOT....let's cool off ~
This recipe needs no introduction - spend the time to pull this together, and I promise you'll be grinning ear-to-ear :) Remember, this ice cream recipe is only a launching pad - you can morph the hell out of it by adding jam, nuts, broken cookies, peanut butter, chopped up chocolate - and instantly amaze everyone! Enjoy!
Sandy's Vanilla Ice Cream makes approx. 2 qts.
5 egg yolks1/4 cup sugar
2 cups heavy cream
1 1/2 cups milk, 2%
1 whole vanilla bean, split and scraped
1 cup white sugar
1 TBL. pure vanilla extract
1 pinch Kosher salt
In your KitchenAid mixer or a large bowl, whisk the egg yolks and 1/4 cup of sugar until the mixture reaches the ribbon stage (glossy and smooth).


In a 2 qt. sauce pan, gently heat the milk, cream, 1 cup of sugar, vanilla bean and its contents, and salt. Whisk constantly until mixture reaches 185° degrees. Take off heat and discard the vanilla bean.


Now, pour all of the ice cream base back into the sauce pan. Under low-medium heat, bring the base to 175° degrees, whisking constantly.

Place sauce pan in an ice bath and bring base to room temperature. Seal in a plastic food container, and refrigerate for at least 12 hours - however, overnight is best.
Now, it's time for your ice cream maker to do it's magic! Follow the instructions to your maker. The end result will be a very soft ice cream that then needs to be frozen as soon as possible!
After a couple of hours, there you have it...yummy homemade vanilla ice cream!! ;-)
Thanks for the QUICKIE (wink!), I'll see ya next week!
Saturday, July 02, 2011
Saturday Afternoon Quickie - Dreamy Lemon Pound Cake
Summertime quickies are the best! ;)
 It's summer....it's HOT....let's make dessert ~
My Oma adored pound cake. In her fridge, come hell or high water, you'd find a bakery fresh, chilled pound cake ready for the daily Kaffee und Kuchen.
To this day, I can't make it through a month without sinking my teeth into a piece of pound cake - whether I purchase it or make it (WAY BETTER), it just has to happen.
The recipe I'm sharing with you today is fool-proof...delicious...and addictive. :) Enjoy!
 Dreamy Lemon Pound Cake *inspired by Allrecipes* serves 10-15
2 sticks (1 cup) salted butter, softened
3 cups sugar
6 eggs
5 TBL. FRESH lemon juice
1 TBL. grated lemon peel
1 tsp. pure lemon extract
3 cups all-purpose flour
1/2 tsp. baking soda
1/4 tsp. Kosher salt
1 1/4 cups sour cream
In your KitchenAid mixer or a large bowl, cream the sugar and butter until light and fluffy.
Then, add your eggs one at a time.
Next, add the lemon juice, grated lemon peel, and lemon extract. Combine well.
In a separate bowl, combine the flour, baking soda, and salt. Now add it to the creamed mixture alternately with the sour cream. Mix until just combined - don"t over do it!
Pour into a greased and floured (hello, I used Baker's Joy and it worked perfectly!) fluted tube pan.
Bake at 350° degrees F for 55-60 minutes or until a toothpick or cake tester comes out clean.
Let cool for about 10-15 minutes, then remove to a plate lined with wax paper.
Let cake cool completely before serving - and personally, I think pound cake tastes better the next day. ;-)

My Oma adored pound cake. In her fridge, come hell or high water, you'd find a bakery fresh, chilled pound cake ready for the daily Kaffee und Kuchen.
To this day, I can't make it through a month without sinking my teeth into a piece of pound cake - whether I purchase it or make it (WAY BETTER), it just has to happen.
The recipe I'm sharing with you today is fool-proof...delicious...and addictive. :) Enjoy!

2 sticks (1 cup) salted butter, softened
3 cups sugar
6 eggs
5 TBL. FRESH lemon juice
1 TBL. grated lemon peel
1 tsp. pure lemon extract
3 cups all-purpose flour
1/2 tsp. baking soda
1/4 tsp. Kosher salt
1 1/4 cups sour cream
In your KitchenAid mixer or a large bowl, cream the sugar and butter until light and fluffy.
Then, add your eggs one at a time.
Next, add the lemon juice, grated lemon peel, and lemon extract. Combine well.
In a separate bowl, combine the flour, baking soda, and salt. Now add it to the creamed mixture alternately with the sour cream. Mix until just combined - don"t over do it!
Pour into a greased and floured (hello, I used Baker's Joy and it worked perfectly!) fluted tube pan.
Bake at 350° degrees F for 55-60 minutes or until a toothpick or cake tester comes out clean.
Let cool for about 10-15 minutes, then remove to a plate lined with wax paper.
Let cake cool completely before serving - and personally, I think pound cake tastes better the next day. ;-)
Thanks for the QUICKIE (wink!), I'll see ya next week!
Saturday, May 21, 2011
Saturday Afternoon QUICKIE - Easy Pizza Dough
It's never too late for an Afternoon QUICKIE -

Well, well, well...I'm finally back from the dead! My precious kiddos will FINALLY be out of school within weeks, which equals more blog time for me.
So, I've been thinking....with gas prices so high and the general cost of EVERYTHING having gone up - it might be time for me to sharpen my skills. It feels like the perfect time to begin producing some homemade family favorites.
First up? - something foodie :)
My husband is Sicilian, my kids beg for Italian food regularly - time to dial in a pizza dough recipe!
An easy recipe that requires a little extra time than calling the local pizza parlor ~
Let's get started:
Easy Pizza Dough makes 4 personal pizzas
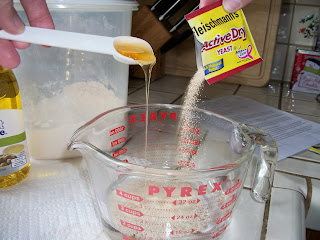
1 package active dry yeast
1 ¼ (up to 1 ½) cups warm water, divided: 110 – 115 degrees
1 tsp. honey
4 cups all purpose flour
1 tsp. Kosher salt
1 TBL extra-virgin olive oil, plus additional for brushing
In glass measure cup, dissolve the honey then yeast in ½ cup warm water. Proof this mixture for 10 minutes, until yeast appears foamy.


Now there are a couple of ways to do this next step:
You can line a baking sheet with parchment, and place all four balls on top. Then, lightly cover with plastic wrap and a dish towel. OR, place each ball in it's own bowl, cover with wrap and a dish towel. Whatever makes you happy...either way, the dough needs to sit and rise for 1 hour.

Do what you like, but my pizza comes out like the picture at the top when I do the following:
Preheat oven to 485 degrees. **any higher and I end up with pizza bricks!**
To prepare each pizza, dip a dough ball into flour and shake off the excess. Place dough on a clean lightly floured surface, and start to stretch the dough. Don’t roll dough with rolling pin, use only your hands to assure fluffy crust.

Well, well, well...I'm finally back from the dead! My precious kiddos will FINALLY be out of school within weeks, which equals more blog time for me.
So, I've been thinking....with gas prices so high and the general cost of EVERYTHING having gone up - it might be time for me to sharpen my skills. It feels like the perfect time to begin producing some homemade family favorites.
First up? - something foodie :)
My husband is Sicilian, my kids beg for Italian food regularly - time to dial in a pizza dough recipe!
An easy recipe that requires a little extra time than calling the local pizza parlor ~
Let's get started:
Easy Pizza Dough makes 4 personal pizzas
1 package active dry yeast
1 ¼ (up to 1 ½) cups warm water, divided: 110 – 115 degrees
1 tsp. honey
4 cups all purpose flour
1 tsp. Kosher salt
1 TBL extra-virgin olive oil, plus additional for brushing
In glass measure cup, dissolve the honey then yeast in ½ cup warm water. Proof this mixture for 10 minutes, until yeast appears foamy.


In a mixer fitted with a dough hook, combine the flour and the salt. Add oil, the yeast mixture and remaining warm water.

Mix on low speed until the dough comes cleanly away from the sides of the bowl and clusters around the dough hook, about 5 mins. The dough should be smooth and firm.
Place dough in a lightly oiled bowl. Cover with plastic wrap to seal. Place a clean kitchen towel over the bowl and let rise in a warm spot for 1 hour.
Place dough in a lightly oiled bowl. Cover with plastic wrap to seal. Place a clean kitchen towel over the bowl and let rise in a warm spot for 1 hour.

Punch down to express some of the air in the dough, then divide into 4 equal pieces. Work each piece into a ball by pulling down the sides and tucking under the bottom of the dough.
Then on a smooth surface (no flour), roll the ball under the palm of your hand until the top of the dough is smooth and firm.Now there are a couple of ways to do this next step:
You can line a baking sheet with parchment, and place all four balls on top. Then, lightly cover with plastic wrap and a dish towel. OR, place each ball in it's own bowl, cover with wrap and a dish towel. Whatever makes you happy...either way, the dough needs to sit and rise for 1 hour.

At this point, the balls can be used immediately or wrapped in plastic and refrigerated for up to 2 days.
Do what you like, but my pizza comes out like the picture at the top when I do the following:
Preheat oven to 485 degrees. **any higher and I end up with pizza bricks!**
To prepare each pizza, dip a dough ball into flour and shake off the excess. Place dough on a clean lightly floured surface, and start to stretch the dough. Don’t roll dough with rolling pin, use only your hands to assure fluffy crust.
When desired pizza shape is achieved, lightly brush olive oil in the inner circle of the dough.
Add toppings in this order:
-Sauce
-Mozzarella cheese
-Pepperoni
-any additional toppings. Finish with a light sprinkle of dried oregano and Feta/parmesan or goat cheese. YUM!
Lightly sprinkle baking sheet/pizza stone with cornmeal. Place prepared pizza in the center of baking sheet, and bake for approx. 13 minutes or until cheese is melted.
Serve immediately.
Thanks for the QUICKIE (wink!), I'll see ya next week!
Saturday, March 05, 2011
Soooo Sorry!
Hi friends!
I wanted to drop a quick line...letting you know how terribly sorry I am for being a very bad blogger lately ~
The stuff in my life has been CRAZY these past couple of months. Hubby is home on injury from the fire dept., kids are getting ready for state testing (we homeschool), we might be moving, the list goes on....
Hang tight my friends, things will get rolling around here again very soon - I promise :)
Saturday, January 22, 2011
New Orleans Coleslaw
It's time for another Saturday Afternoon QUICKIE -

Here in Southern California the weather this week has been CRAZY ~ unseasonably warm for winter! 40-°F degree nights, 70+°F degree days.
The result? My taste buds are completely confused and craving spring and summer dishes.
So, I was sitting at the table this past week, trying to decide what to serve next to my favorite brisket. I wanted something delicious that also would sneak in some healthy veggies for the kiddies...and then BOOM!, it hit me: Nigella's New Orleans Coleslaw.
I discovered this "slaw" last summer and it's definitely one of my absolute favorite sides....it's light yet packed with flavor! YUM!
The recipe also makes use of one of my "top shelf" most favorite ingredients, Pure Maple Syrup. Sound interesting? Trust me, it totally works in this dish.
Now, it's been my experience for best flavor, to only make enough of this side for your meal. For my family, that equals to about half of the original recipe. Fresh is best with this slaw, so serve it as soon as the flavors have sufficiently married (1-3 hours).
Here we go ~
New Orleans Coleslaw serves 4-5
inspired by Nigella Lawson
2 scallions, sliced thin
1 carrot, peeled and grated
1 celery rib, peeled and diced
1/2 of a medium-large head of green cabbage, cored and sliced thin
1/3 - 1/2 cup sliced almonds
1/2 cup (4 oz.) of your favorite mayo (or make it yourself!)
2 TBL. buttermilk
2 TBL. Real Maple Syrup (don't skimp on this friends)
1+ tsp. cider vinegar
1/4 - 1/2 tsp. Kosher salt (you might need more...just be careful)
1/2 tsp. ground black pepper
Let's start slicing up the cabbage.

Everyone has their favorite way to slice or chop cabbage. Do whatever works for you, but I'm going to demonstrate the way my German Oma taught me.
First, wash and pat dry your cabbage. Now for this recipe, make a clean cut down the center - to divide the cabbage in half.

Now, quarter and core the cabbage...


Separate the top leaves from the inner leaves of the cabbage quarter before slicing. It makes it easier to accurately slice the leaf sections one after the other...the top leaves spread out flat for simple slicing and the inner leaves are a snap to chop up quickly!

Time to grate and chop up the rest of the veggies!


Combine all vegetables in a large bowl, give a quick toss.

In a separate medium bowl, whisk the dressing ingredients. Pour over the veggies and add the almonds. Toss to combine. Place slaw in a container with a tight fitting lid and refrigerate until ready to eat! Don't forget to "tweak" as needed...some may prefer more vinegar or less syrup. The important thing to remember is as with most salads, you HAVE to give the salad time to rest before you taste. Flavors develop over time especially when the salad contains any type of vinegar. Try not to judge whether you like it or not too soon...you might be pleasantly surprised after an hour or so!
Super simple, very delicious...I hope you love this coleslaw too!
Thanks for the QUICKIE (wink!), I'll see ya next week!
Saturday, December 18, 2010
Candied Orange Peel
So, I'm usually WAY too busy to attempt the Martha Stewart-ish kind of holiday razzle-dazzle this time of year. However, there was no way I was going to allow another Christmas to pass without tucking a new skill or recipe under my belt. And THIS was my year...
Well, I humbly stuck my toe into the kiddie pool of: CANDIED FRUITS - those glistening, succulent, sugar coated fruit gems we pay $$ for at the local designer Farmer's Market.
My husband requested a fruit cake, (not one of my favorites) so I decided it was the perfect opportunity to experiment with at least one personal contribution - Candied Orange Peel.
I've never attempted this before, so I went to a trusted source, Epicurious. Boy, I'm glad I did. :)
Yes, I tweaked it...you know me ~

3 large oranges, 1/4 inch of the top and bottom cut off
*(original recipe called for only 2 oranges, but 3 worked perfectly!)*
4 cups white sugar, divided
2 cups water
1 cup of Grand Marnier Liqueur
*(original recipe calls for only 3 cups of water)*
Slice 1/4 inch off the the tops and bottoms of each orange.

Score peel on each orange into 4 vertical segments. Remove each segment (INCLUDING the white pith) in 1 complete piece.

Cut segments into 1/4-inch wide strips.

Cook in large pot of boiling water for 15 minutes; drain, rinse and drain again.

In a saucepan over medium heat, bring the sugar, water and Grand Marnier to a boil. Stir to dissolve sugar.

Add peel, and return to a boil. Reduce heat. Simmer until peel is very soft, about 45 minutes. Drain.
Toss peel in 1 cup of sugar on a rimmed baking sheet, separating strips.

Lift peel from sugar and transfer to a sheet of foil. Let stand until coating is dry, 1-2 days. *TWEAK ALERT* (to speed things up, I used a fruit dehydrator for 1 1/2 hours. It worked perfectly!)

You'll notice that nowhere in this recipe does it mention the need to remove the "pith" of the orange. At first I was skeptical, understandably, but trust me - it isn't absolutely necessary. Yes, on the first day the peels will have a slightly bitter bite - but on day two it's virtually gone.
So after the fruit cake is made...I will take the left over candied peels and dip them half way into dark chocolate. THEN...remember the leftover Grand Marnier/Orange simple syrup I simmered the peels in for 45 minutes? It's coming with me to a Holiday Party tomorrow night, as it will help to make the perfect margarita! (wink!)
Have a beautiful Christmas and Holiday Season...I look forward to sharing with you in 2011!!
Oh, and thanks for the QUICKIE (wink!), I'll see ya next week!
Well, I humbly stuck my toe into the kiddie pool of: CANDIED FRUITS - those glistening, succulent, sugar coated fruit gems we pay $$ for at the local designer Farmer's Market.
My husband requested a fruit cake, (not one of my favorites) so I decided it was the perfect opportunity to experiment with at least one personal contribution - Candied Orange Peel.
I've never attempted this before, so I went to a trusted source, Epicurious. Boy, I'm glad I did. :)
Yes, I tweaked it...you know me ~

Simple Candied Orange Peel makes approx. 4-5 ounces
3 large oranges, 1/4 inch of the top and bottom cut off
*(original recipe called for only 2 oranges, but 3 worked perfectly!)*
4 cups white sugar, divided
2 cups water
1 cup of Grand Marnier Liqueur
*(original recipe calls for only 3 cups of water)*
Slice 1/4 inch off the the tops and bottoms of each orange.

Score peel on each orange into 4 vertical segments. Remove each segment (INCLUDING the white pith) in 1 complete piece.

Cut segments into 1/4-inch wide strips.

Cook in large pot of boiling water for 15 minutes; drain, rinse and drain again.

In a saucepan over medium heat, bring the sugar, water and Grand Marnier to a boil. Stir to dissolve sugar.

Add peel, and return to a boil. Reduce heat. Simmer until peel is very soft, about 45 minutes. Drain.
Toss peel in 1 cup of sugar on a rimmed baking sheet, separating strips.

Lift peel from sugar and transfer to a sheet of foil. Let stand until coating is dry, 1-2 days. *TWEAK ALERT* (to speed things up, I used a fruit dehydrator for 1 1/2 hours. It worked perfectly!)

You'll notice that nowhere in this recipe does it mention the need to remove the "pith" of the orange. At first I was skeptical, understandably, but trust me - it isn't absolutely necessary. Yes, on the first day the peels will have a slightly bitter bite - but on day two it's virtually gone.
So after the fruit cake is made...I will take the left over candied peels and dip them half way into dark chocolate. THEN...remember the leftover Grand Marnier/Orange simple syrup I simmered the peels in for 45 minutes? It's coming with me to a Holiday Party tomorrow night, as it will help to make the perfect margarita! (wink!)
Have a beautiful Christmas and Holiday Season...I look forward to sharing with you in 2011!!
Oh, and thanks for the QUICKIE (wink!), I'll see ya next week!
Subscribe to:
Posts (Atom)
-
 Weekly Reminder: What is a "QUICKIE" anyway?...hmmmmm, found this online: "Very little foreplay, quick finish. Usually 5-10 ...
 -
 Today silently belongs to the many that lost their lives nine years ago. My husband was part of a crew from Los Angeles County Fire that fle...